Triumph Bonneville flying high

Triumph Bonneville in hanger

Triumph Bonneville joins the jet set

Triumph Bonneville: Flying High.

This photograph is of a Triumph Bonneville SE 2012 with an aircraft hanger as a background. The cool colour qualities of this setting create almost a black and white feel to the photo, which allows the warm colours of the bike to stand out to good effect.

Also the Bonneville is a retro bike, which looks good set against a modern jet set backdrop.

Motorcycle Photography Light Painting Project: 1

Motorcycle photography tips

Light painting technique

Motorcycle Photography: Light painting.

Here we have an example of the ‘Light Painting’ technique. The subject used was a Triumph Bonneville SE photographed using a Nikon D700 mounted on a tripod with a 30 second exposure, f16, ISO 1000. The light source was a small hand held pencil torch used sparingly to ‘paint’ in the detail. With this method of bike photography, sometimes more is less and the generous use of what in photography terms is called Negative Space, adds an edgy feel to the photograph.

Motorcycle Photography South West

Motorcycle Photography South West

However these photographs represent a first attempt at this slightly tricky technique and the resulting images look flat and underexposed. Using an effect called tone mapping during the post production also hasn’t helped.

It was done to deliberately try and inject a cool feeling, but has in fact contributed to the images looking drab.

The other main problem was I had tried to capture the image in one 30 second exposure and that is not good practice.

To see how the project progressed and the changes made to improve the outcome, read the second part: Motorcycle Photography Light Painting Project: 2

Add ‘Grunge’ with textured backgrounds

Motorcycle photography techniques

Motorcycle Photography Editing

Motorcycle Photography: Editing techniques.

Here we have a photograph of a Triumph Thunderbird photographed outside of Greenway House, a famous National Trust property which was once the home of Agatha Christie.

The bike looked good against the cream wall, but now has a different ‘grunge’ feel to it after textured layers were added and then blended in Photoshop. This style of post processing editing would also work well for motorcycles photographed in an urban setting.

Triumph Thunderbird Sport photo shoot

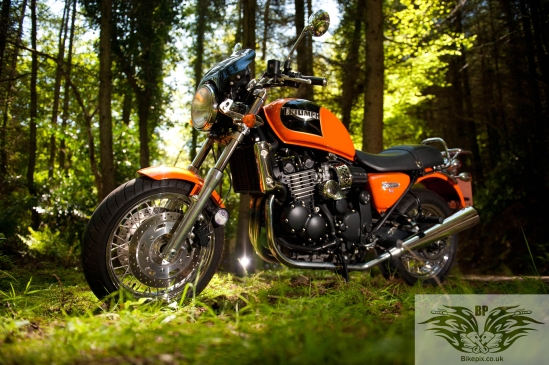
Here is a photograph of a Triumph Thunderbird Sport motorcycle taken in woodland. This bike photography shoot was set up using off camera flash and if you click and zoom in on the photograph you can see how the detail of the bike is picked out.

BikePix motorcycle photography.

Triumph Thunderbird Sport woodland photo shoot. BikePix motorcycle photography.

Motorcycle photography is no different than photographing any other subject and the same portrait techniques and principles apply. In this example the strobe flash lighting was positioned to light the bike and enhance the detail, whilst be careful to avoid direct reflections which would create ‘hot spots’ and blown out highlights.

Exposure is controlled by using the camera in Manual mode to select the correct aperture and shutter speed for the ambient lighting conditions.

The picture below shows just how the photo shoot was set up using wireless controlled flash:

Motorcycle Photography photo shoot set up

Motorcycle Photography: photo shoot set up


Triumph Thunderbird Sport woodland photo shoot

Triumph Thunderbird Sport woodland photo shoot

Second project: Triumph Bonneville SE

Triumph Bonnieville 2012 SE

Triumph Bonnieville 2012 SE

Todays project was to photograph this Triumph Bonneville SE on Paignton seafront.

I was lucky in that some canoeists came along at just the right time and with careful composition, I was able to include all three into the background of the photo.

The ambient lighting for the original photograph was a bit drab and I used a single fill flash to pick out some of the bikes detail. The background was slightly underexposed using a faster shutter speed on camera manual setting.

Once the photo was being edited, the colour cast was warmed up by adding a digital daylight filter. Colour contrast was increased and the glinting sun was added using the lens flare filter in Photoshop. Overall brightness was increased and then a graduated filter was added to stop the sky overexposing.

Triumph Bonneville original

Here is the original photograph before editing, which shows how the early evening light was quite drab and uninteresting due to cloud cover. Also the flash lighting was horrible as it was used on the camera, the worst possible place as that produces ‘flat lighting’.

I was travelling light and had just packed the camera and a single flash gun into the travel bag. So all things considered, it was not a pleasing picture to start out with. There was also some damp marks showing on the floor which were distracting to the eye, but there were cars parked tight either side and so I had limited room to work with. The darker marks on the floor were removed in Photoshop; the sort of post production editing I normally try to avoid as I prefer to ‘get it right’ in camera whenever possible.

On this occasion, it was the editing that saved the day; turning a rather dull photograph into something with ‘visual punch’ and interest.

First project: Triumph Thunderbird Sport night shoot

Triumph Thunderbird Sport at night

Triumph Thunderbird Sport at night

Here is the first post detailing a motorcycle photography shoot from concept to photograph.

The idea was to create a slightly surreal picture featuring the Thunderbird Sport apparently photographed at night bathed in moonlight.

Ok, so now to unravel it all and explain how it was done.

This shot was originally taken early afternoon and the scene was backlight by the sunshine. It was this sunlight that was going to give the effect of the bike being lit by the moon.

Triumph Thunderbird original shot

The equipment used for this shot was:

Camera: Nikon D700

Lens: Nikon 24-70 f2.8

Camera mounted on a Manfotto tripod

Flash: 1 x SB800, 1 x SB900 trigged by Pocket Wizard wireless control.

The SB900 was camera right and fired into a silver brolly reflector as the fill light. The SB800 was left of the camera and fired directly at the bike, the angle being such that the light reflected and picked out some of the details.

Editing:

Once there was a photograph to work with, it was firstly processed in Color Efex Pro 4 using the Midnight filter. The image was then saved as a TIFF and exported into Photoshop where the moon and night sky were added and blended. It was important to cool down the tones from the original shot to give the moonlight effect.